Cheers,
John...


Okay... Here we go from the beginning. Take a deep breath and bare with me. Haha...
I started out with foam pieces that were just really dense. I didn't care that they were not the standard pink foam I used because I knew none of it would be showing when I was done. This was strictly for support. Like I said this stuff was denser than normal packing foam and has a great structure to it. I started off by carving bass wood with some designs and then using a wire brush to force the weathered grain look.

After framing it up with the wood I wanted to make a frame so I could pour the plaster that I would later carve.

Once the plaster is poured I let it set up for 30-45 minutes before carving.
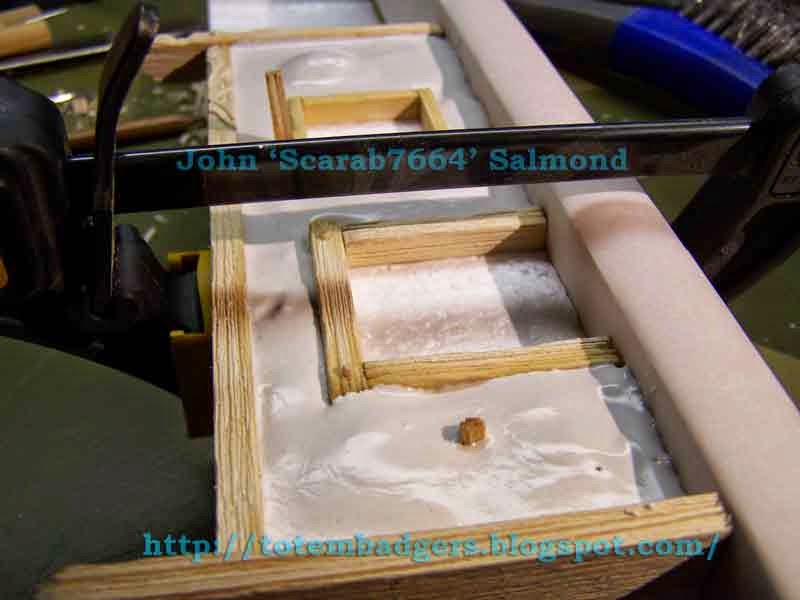
In some areas I would wait for the plaster to stiffen up a bit and then add more to one specific spot that I wanted to have raised stone during the carving process.

Alright... you tired yet? Well I am going to create a page break here. There are a ton more pictures to view if you are up to it. ;) I just don't want to make a ginormous post.
Once again I am framing up more of the areas to working on. In these pics you will notice tooth picks stabbed into the foam. Well they are holding the pieces in place as they dry because those pieces are either on an angle or on the edge.


Now I could tell you that I am an amazing sculptor and carved that skull. Now that would be a giant lie. Haha... What I did is I made a mold of a skull so I could make a pour with plaster. I then glued it in place after it had cured for a few days. I wanted the skull completely dry. Then when I poured the final plaster layer the dry skull would suck the moister up from the skull and give a smooth transition for the skull. I did clean it up a bit but I think you get the idea. You can use that trick with other poured items as well. I wanted the skull to be facing down a little so it was not readily noticeable at first glance. Just sort of a little Easter egg if you will.


Carving the totem was a little more ambitious. I am not that skilled at it. The wings are done as separate pieces and glued to the main piece. I hope to make it look nice during painting.


During the carving of this piece I had a little mishap and drove the X-acto blade really deep into my finger. The hazards of making terrain. Haha... The up side was because the blade is so sharp it did not hurt at first. Can't say the same for a few minutes later. Still not the worst wound I have ever had though. Once I dropped an X-acto hobby knife and it fell and stuck in my leg and just sat there.

Here is another pour. Once again I used a clamp to form it up on both sides. The top had a form from the piece of wood I glued there so I only used as plastic covered wood for the bottom. There are some pours that the top and bottom had glued wood strips placed in so I did not have to create an temporary frame to hold the plaster in so it did not run all over the place.


For the chain I just wanted something different. So I stuck a chain on this piece. The lower end I knew I would be covering up later.

Just some more progress shots using some of the same methods I have already described. Cutting, scoring, using toothpicks to hold stuff in place and so on.


Now after I had laid the frame work for the walkways I wanted to paint the dirt. Leaving it white is a bad thing. Why? Because after you lay the planks it becomes almost impossible to paint the white under the planks. I have done this before several times. So this time I wanted to paint it all brown before proceeding to the next step.


Now that the dirt is all painted I proceeded to carve up the planks and glue them in place using Elmer's White Glue.

Just added some variety next to the join of the two sections.

I really hopped around during this project. At this point I decided to add the dirt and garbage on top. In some third world countries the residence will throw garbage on top of their buildings. This was the idea for part of the Row Houses. The white material is Sculptamold which I prefer over Paper Mache. Sculptamold does not shrink when it dries. The other does really bad and I have struggled with other projects because of it. Drove me crazy. This material was like striking gold for me when it comes to making terrain. After I applied it I just used to sizes of sand an sprinkled it on and the lightly pressed the sand into the material.

After the Sculptamold was dry I used bits, cast from Hurst Arts molds and other items to apply the garbage and debris.

I paint the everything that I just glued on the top of the first section with a dark brown. The went back to working on the joint for the two section. I want the Row House to separate into three pieces for easy storage. This first shot is the two sections together.

This shot is pulling them apart.

Wide shot of what the front looks like so far of the first two pieces.
I wanted to take a break from assembly and paint part of it. So I started on the top. Did four colors for the dirt. The wood is where I want it so far. I might change it up when other items are painted. The backpack and the green cloth are also done.

Whew!! That was long. Well you are all caught up now. Hope you enjoy. If you have any questions you can either comment here or contact me at totembadgers@gmail.com and address it to me.
Cheers,
John...
No comments:
Post a Comment