Showing posts with label Hobby Terrain. Show all posts

Sunday, November 9, 2014

Table Top Terrain - 3" Wall WIP #4

This is step is a little time consuming because you have to get into each and every little crack and crevice. Even after painstakingly going over it you still can have white spots you might have to come back a touch up here in there. I rarely get a finishing pass the first time when I apply the base coat. This is the base coat applied over all the pieces. I used Burnt Umber for the darker color. I didn't want to go black. I avoid black washes or base unless it is black, gray or armor, generally speaking.


The next step is a cross between dry brushing an a little wetter. I was not overly concerned if a little more paint was applied here and there. I will let you read the bottle for the color. This gave a little redness to the ground.


This is where I begin to try a little harder on the dry brushing. I normally stay away from dry brushing but when it comes to earth and stone I think it works well. Plus if I was to paint every piece by hand it would not be a pleasant sight to behold.


This color is Spice Tan. This is a rather old bottle and I am almost out of it. With each lighter color I try to have less and less paint on my brush. The lighter colors don't need a ton to show up really well. Plus it is hard to recover if you apply to much.


Final color. I could go higher but on these pieces I think this is plenty.


This step takes a while and you may want to take breaks to you don't get sloppy and apply to much paint. Hope you enjoy.
Cheers,
John...


Friday, November 7, 2014

Row House - Table Top Gaming Terrain

Well this is going to be a long post. To be frank it will be all my progress pictures up to this point. I will try to add comments and steps as to what I was doing as we go along. To give a brief explanation I was looking at some inspiration pieces of terrain that were made for Rackham miniatures. I wanted to explore that method of constructing terrain so I embarked on this project. I tried different things as I went a long. Then I took a break for over a year on the piece because life happened. I am now getting back to it an plan on finishing it. I was originally going to attach it to a port board but the time and effort spent on it I decided to keep it an individual piece that can be an edge piece on any board. I struggle with the over all theme because the games I play are largely different in themes. So I am just kind of doing whatever mostly so I can learn from it. Anyway here you go. I will start off with a progress pic of where this project is currently at and then start at the beginning.

Cheers,
John...


Okay... Here we go from the beginning. Take a deep breath and bare with me. Haha...
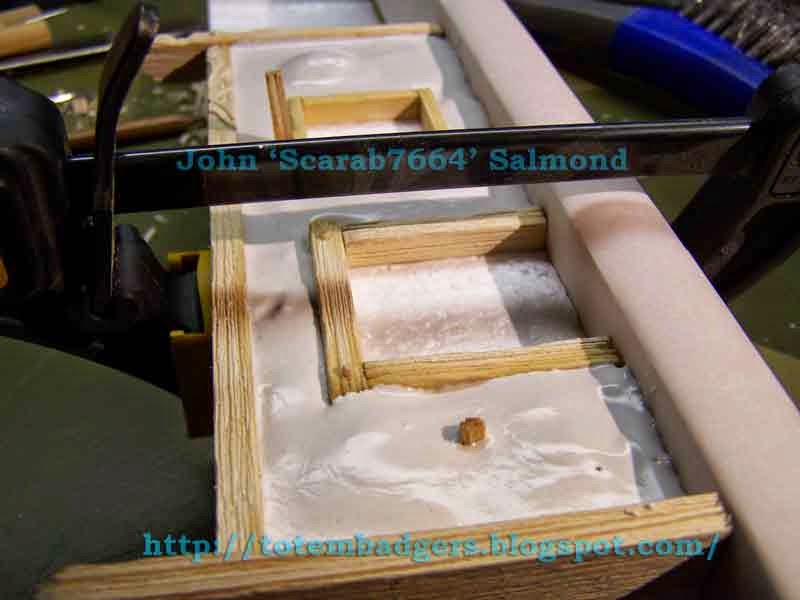
I started out with foam pieces that were just really dense. I didn't care that they were not the standard pink foam I used because I knew none of it would be showing when I was done. This was strictly for support. Like I said this stuff was denser than normal packing foam and has a great structure to it. I started off by carving bass wood with some designs and then using a wire brush to force the weathered grain look.


After framing it up with the wood I wanted to make a frame so I could pour the plaster that I would later carve.


Once the plaster is poured I let it set up for 30-45 minutes before carving. 


In some areas I would wait for the plaster to stiffen up a bit and then add more to one specific spot that I wanted to have raised stone during the carving process.


Alright... you tired yet? Well I am going to create a page break here. There are a ton more pictures to view if you are up to it. ;) I just don't want to make a ginormous post.

Table Top Terrain - 3" Wall WIP #3

Well this is the third installment of the 3" Wall terrain pieces. They are becoming a little effort but regardless they are still coming along faster than a larger project would be so that is a bonus. The bummer is I forgot to take a picture of one of the steps but I still think you will get the idea anyway.

So the first thing I did was to apply the finer grain sand to a wide area on each piece using white glue. Then I immerse the piece into my tin and let it sit for a while before pulling it out. I want the sand to fully be adsorbed by the glue.


After the fine sand I just used the bottle of white glue and dropped some glue in key places. I used the tip of the bottle to spread the glue around because I wanted to keep the glue thick. This was for the larger gravel areas.


After letting the large grain pieces to be set in but not waiting to long I pulled the pieces out and then sprinkled fine grain sand on the larger grains so it would absorb into the cracks.


So here is the step I forgot to mention. Adding the wood planks in. As you can see by the picture not very hard stuff so no big deal about not taking a picture. 


This is turning out to be a fun project. Hope you enjoy.
Cheers,
John...


Monday, November 3, 2014

Table Top Terrain - 3" Wall WIP

Another installment of the terrain I want to have easily portable. This is shaping up to be a little more apocalyptic so it might be good for a game like Dark Age. I went through my bits box and just grabbed random items in case I wanted to attach them to the pieces. I also broke up some wood pieces and other items such as pipes and block. Once that was done I mixed up some sculptamold and began applying it to the pieces. I framed up some of the wood so I could added floors later and only used half the drums for economic reasons. After this all dries I will add some other pieces and possibly some small rocks for texture. Not much else to say really because this step was very straight forward. Now to move on to another piece while this one dries.
Cheers,
John...


Wednesday, October 22, 2014

Table Top Terrain - 3" Walls WIP

Was thinking that I want more portable terrain that I can easily put in boxes and take with me. It will also make it easier to store. So I thought I would start with making some simple walls that were battle damaged. Nothing to fancy. The most important factor here is making them fit in a box to transport. So I went with keeping the terrain under three inches tall. I will have several projects like this were the terrain pieces will not exceed the three inch height. The material for these pieces is plaster. Just made a frame and poured the mixture in, let is set up and started busting them into pieces. Used a dental tool to break up the edges and make some bullet holes. I will end up making more bullet holes. The holes I made were mostly due to the fact there were bubbles so I had to make use of them.

Cheers,
John...